2009-06-02

Canon MP-E 65mm Macro/Micro

Sea Salt taken with a Canon Rebel, MP-E 65mm 5X macro lens taken at 3X magnification:

The Canon MP-E 65mm is a very specialized lens for 5X magnification macro (Nikoners call it "micro"). It is one of the favorites amongst biologists, geologists, people into shooting rare gemstones, and such. This macro lens can fill the entire frame with a picture of a grain of rice! This amazing lens is also one of the most technically difficult lenses to use correctly. It is a completely manual focus lens where focus is achieve through moving the lens back and forth. Therefore, it is often necessary to use the focus rail mounted on the lens. Since sharpness is of high importance, let's "pixel-peep"; blowing up pictures to look at technical quality of the images.

It is important to understand that the depth of field on macro lenses is very shallow. Also, there is a difference between displayed f-stop and effective f-stop. Canon MP-E manual page 8 displays a chart of displayed f-stop and effective f-stop. For the remainder of this article, I will reference f-stops in the format of "displayed f-stop(effective f-stop)." With this lens, at 5X at f/2.8(f/16.8) the depth of field is only 0.048mm, and at f/16(f/96) it is only 0.269mm. That means if you're off by only 1/4 of a millimeter, your subject will be out of focus! Other technical difficulties make it a challenge to use this lens; there isn't enough light going into this lens even at 1600 ISO, thus one needs to use a macro flash (with near-full power) to get good results. I highly recommend shooting everything on complete manual mode to get a much more consistent result, minimum ISO for least grains, as well as a sturdy tripod, a focus rail, a remote release, and a good knowledge of the relationship between flash power and distance.


While this lens can go up to 5X and f/16(f/96), it doesn't mean all subjects should be shot at f/16(f/96). The reason is at such a high aperture, diffraction in the lens will render overall soft focus. Below is an original (a wedding invitation).
Cropped:
Every lens has an optimal aperture for sharpness, and from the above we see that the optimal sharpness at 1X magnification is attained between f/8(f/16) to f/11(f/22). Since every lens has an optimal aperture at different magnification, below is an illustration for 3X magnification:
It's very hard to see from this picture (Blogger keeps down-sizes this picture) but trust me, optimal sharpness at 3X is at around f/5.6(f/22.4). Now let's look at 5X:
Here we see that optimal sharpness (sweet spot of the lens) at 5X is around f/5.6(f/33.6). However, every picture at 5X is pretty soft. I believe a 12MP sensor on the Canon XSi has more resolution than the lens can resolve at 5X, thus I don't recommend shooting at 5X with modern high mega-pixel cameras.

In summary, for maximum sharpness at 1X, set your camera between f/8-f/11 displayed aperture. At 3X, set your camera to about f/5.6. God forbid you need to shoot at 5X with a modern camera, set it to about f/5.6. Anything less than optimal sharpness (the "sweetspot") will provide too little depth of field, and anything greater will result in lens diffraction-- softness in overall picture. As for flash, use the inverse square-root law. To double your flash power, you can either double the flash power, or just move the flash to-from the subject distance by 1/2.

Lastly, for 3-dimensional still-moving objects that require high depth of field, I still recommend setting the lens to the sweet spot despite its shallow depth of field. Instead, use focus stacking software to auto-stitch multiple partially focused pictures into one picture. Below is an example with 5 different partially focused pictures stitched into one picture:

Same picture as above just cropped further. This is a picture of one grain of salt:

Ok, now that we've found the optimal sharpness in this lens, go shoot bugs and exotic jewelry!

2009-05-08

Fixing up Nikon FE2

Brian lent me his old Nikon FE2 since he doesn't use SLRs anymore; modern point-and-shoot is good enough for him.

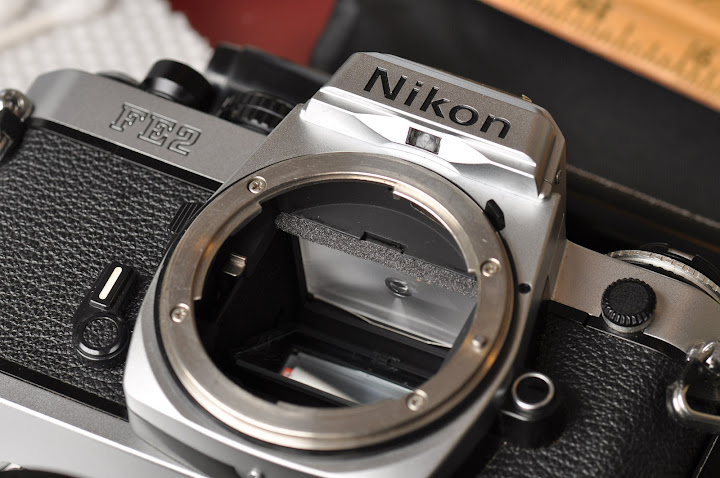
Upon a quick inspection, this is a moderate-light used FE2. The exterior is a bit banged up (esp on the bottom) due to not using a protective shell. The viewfinder is full of black clunks (from disintegrated rubber). On the other hand the shutter is very crisp and responsive, the crank is light, the lightmeter (center weight) is pretty much spot on. The lens is well oiled and precise. However, like most old SLRs, the rubber parts are mostly disintegrated. This includes the mirror damper, which is one of the first parts to disintegrate on all SLR cameras. Next to disintegrate are the light seals and cloth seals around the film container.

The internal sounds great thus one can skip the usual CLA process (thank goodness), but it does need new rubber replacement parts. There are 2-3 major online retailers that sell seal replacement parts. I bought mine from Interslice of eBay, which provides enough materials to seal 2-3 SLRs for a very low price.

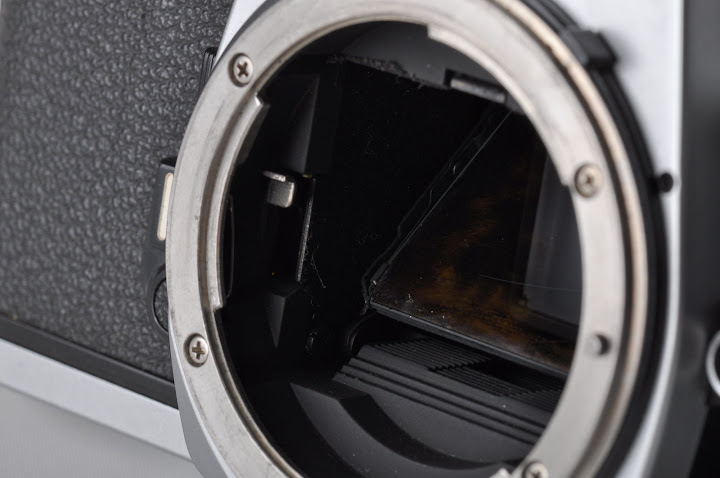
First, the clean up process, using solvents. What you see above the mirror is disintegrated goo-gunk instead of a mirror damper. Over 2 decades of oxidation, heat, humidity does this to the mirror damper. It'll happen to your most modern 2009 SLR as well! Just give a decade or two, it'll happen. If you're going to clean it up, you can use the liquid lighter (give ample room for breathing), or if you're careful, alcohol is acceptable too but DO NOT USE ALCOHOL ON THE VIEW FINDER! It will smear it permanently and you'll have to get a new one.


This is how you clean the mirror damper/rubber. Just rub it off using a bunch of Q-tips and eventually it'll look something like this.


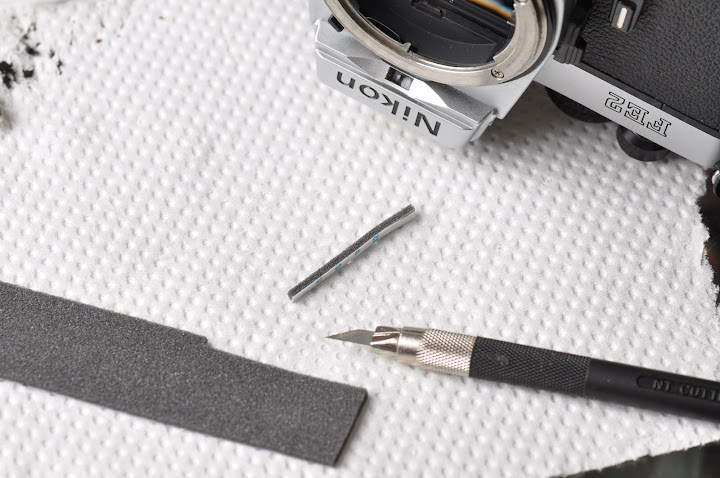
Now to get a new mirror damper-- slice off a piece of mirror damper. Interslice provides dimensions with detailed instructions here: http://www.kyphoto.com/classics/sealreplacement.html


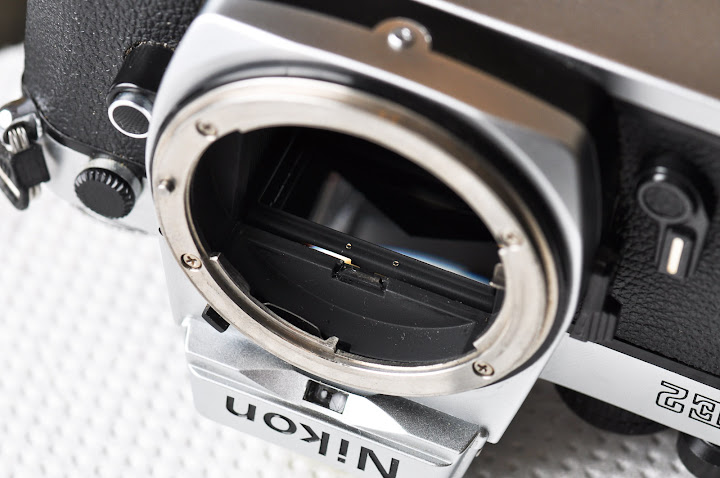
This is what it should look like when you've cleaned up the mirror damper. By the way, this is an excellent time to pop-off the focusing screen so that you can clean up the junk around to make the view finder nice and clean again. Make sure to not rub against the screen or else it'll scratch easily. Also, make sure you know which side of the focusing screen you're mounting on as the side matters for focusing accuracy.


This is what a mounted mirror damper should look like. By this time, all the black gunk from the mirror and focusing screen should be cleaned up. I also replaced the light seals in the back of the film container. Now to test it-- use your ear! If it sounds good, it's good. The FE2s have a click-snap sound. Unlike the sluggist Minolta shutter (sounds like thut-swoooosh-clip), the FE2 sounds crisp. Precise. You know a good Nikon titanium shutter when you hear one.


History

The FE2s were made between 1983-1987. This is the successor of the FE. At the time Nikon had two similar bodies-- the FM/FM2 and the FE/FE2. While the FMs are fully mechanical driven (you set the time and the aperture with a lightmeter driven by a battery), the FEs are mechanically driven, but electrically released. This means that you can set the exposure to A mode (just like Aperture Priority in today's world) and let the electronics determine time exposure. Hence, the FEs must have battery in them or else the shutter will not close. The FE2 takes in 2 light weight watch batteries (A76) and each shutter firing only takes about 25mw. One can shoot thousands of pictures without worrying about running out of battery. If you do run out of battery, you can also set to a backup mode of constant 1/250 sec shutter speed, and it'll be just like the fully manual Nikon FM.

Back then, the FE2s were aimed at prosumers. In the mid 70s, during the electronics and camera integration revolution, Minolta, Olympus, and Canon were mass producing consumer cameras with many electronics and plastic parts. Auto-focus was starting to appear on many other brands. Electronic aperture was starting to see its infancy. On the other hand, being typical Nikon as it is, it sticks to older, more proven technologies-- quality metal exterior, titanium shutter, heavy, durable, mechanical driven-- but no auto-focus... minimal electronics. People say that Nikon is to stick-shift as Canon is to fully electronic everything; 20 years later, that is still somewhat true! Nikon's conservative tradition dates back to the early and mid 60s Nikon F series (original F, F2, etc) where it built fewer cameras that used older technologies, but built them like a tank. While the lack of electronic automation made it difficult for beginners and consumers to use, the legendary built quality and the lack of fancy parts made it extremely popular amongst experienced wartime photojournalists in the 60s and 70s who trusted their Nikon F cameras to fire more than they trusted their rifles to fire. It is said that Nikons captured many images of the 60s and 70s... including that of Earth and the moon from space missions.

The FE2 continues that tradition-- manual focus, manual aperture, manual power. Unlike its original F predecessors (professional series) however, it's much more compact, with titanium shutter that boasts a whopping 50,000 shutter lifetime (which is over many other cameras at the time). Its simplicity and lack of fancy parts made it very durable and popular amongst professionals who used it as a backup camera in conjunction with their F/F2/F3. There are still some film shooters today-- most of them will prefer Nikon over any other brands.

The lack of electronics and parts does not mean the FE2 lacks features. Compared to the barebone K1000 from over a decade ago, it has a built in timer, film pop-lock, multiple exposure tab, AEL (exposure lock), TTL (no kidding!!!), Aperture Mode, depth of field preview, backup manual exposure, +2/-2 exposure compensation, shutter lock, optional electric drive module. It boasts lens compatibility unparalleled in any other brands (can use Nikon lenses spanning in 5 decades). It also boasts the legendary Nikon built quality-- while most modern DSLRs will be obsolete in 3-4 years with incompatible batteries and lenses, you'll still be able to use this camera in another 50 years. This is a camera built to last a century. No, this is not a collector's item, yet. It's not as collectible as the 1940/50 Leica Ms, but it has the same built quality as the Leicas and I'd be surprised if it's not a collector's item a few decades down the road.


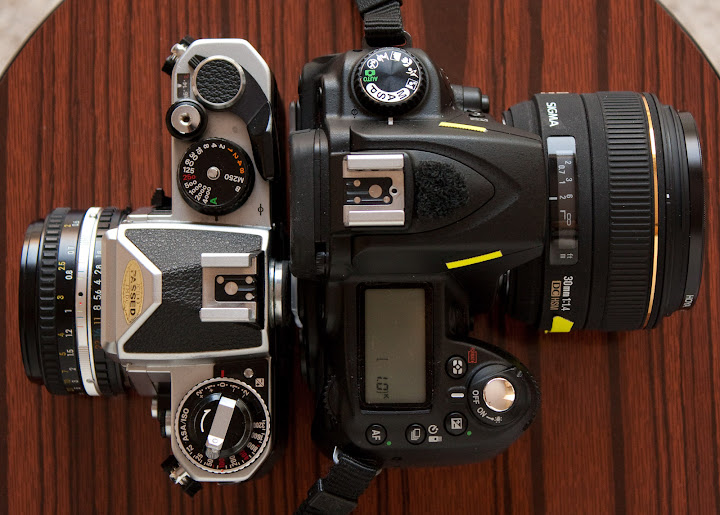
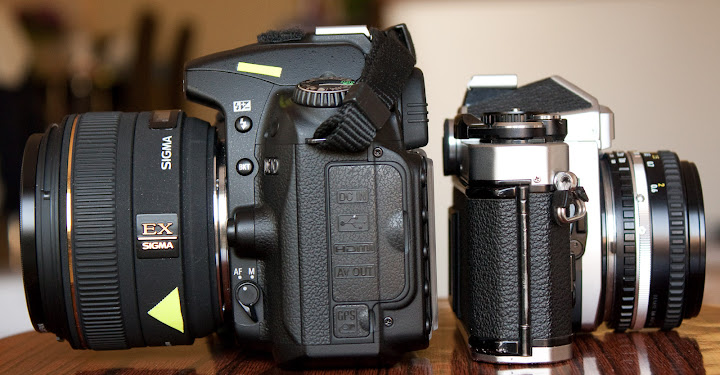
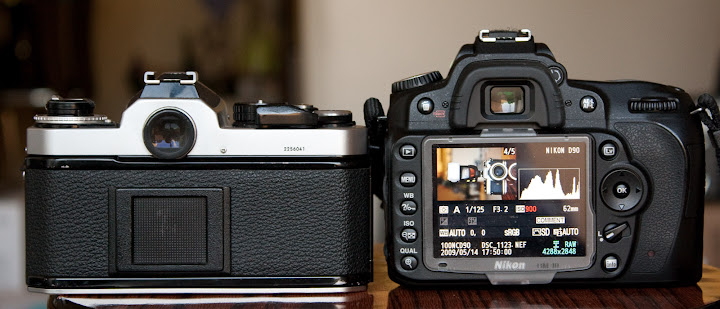
Above are pictures for comparison. The ancient looking metal camera is a 1983 Nikon FE2 with a standard Nikkor 50mm f/1.8 AI lens (775 grams). The other one is an almost equivalent modern standard-- a Nikon D90 with a Sigma 30mm f/1.4 Sigma APS-C (1250 grams). Yes, one is full frame, one is "half-frame"... one is 25 years older, but in terms of price adjusted for inflation and target audience at the time of release, they're quite equivalent. Interestingly, the modern one is mostly plastic but still MUCH bigger and heavier. This is most likely due to 1) battery 2) more motors 3) bigger lens for f/1.4. The FE2 has no motor.

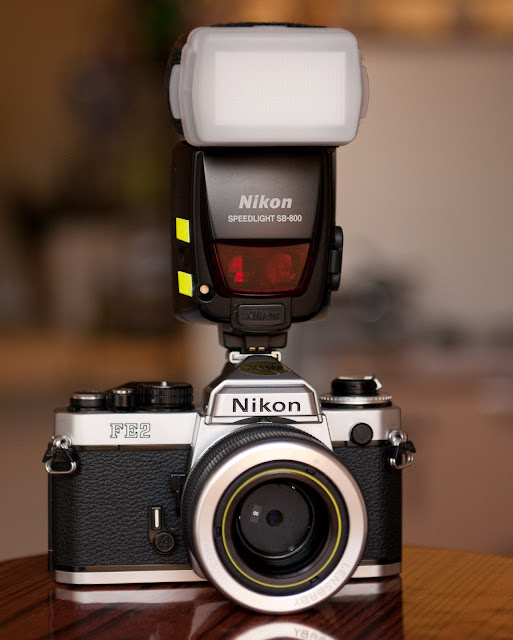
This is a picture of a 1983 FE2 mounted with a 2008 Lens Baby 3G and a 2007 Nikon Speedlight SB-800 with TTL!!! Not many manufacturers today can boast compatibility spanning across so many decades.

By the way, all of these pictures of FE2 are taken with my wife's Canon Rebel XSi.


Sample Pictures

How good is the FE2? Below are some samples. But before you judge them, first of all, note that we shouldn't judge them by today's standards. Modern pixel peepers will point out flaws and such in lens, features, etc. On the other hand comparing a 1980s technology to a 2009 technology is like an apple and orange comparison.


In short, the FE2 is a rare metallic mechanical wonder with minimal electronics that had a very short production run, possibly due to a lack of profit. It was built in an era where other manufacturers preferred to mass produce cheap plastics and electronic parts. Because the FE2 was built with old but proven technologies, it is a camera that will outlive me, and outlive the usefulness of modern plastic cameras. This is a classic camera that one keeps, that one passes down to generations, with stories to be told.

2009-05-04

Reusing disposable cameras


Someone asked me if it's possible to reuse disposable camera bodies. Yes of course! This blog is a tutorial on how to reuse disposable camera bodies. You can buy disposable cameras and when you're done, take out the film and keep the camera body, then reload them and reuse them. In fact, when you give disposable camera bodies to a camera shop, they simply take out the body and return it to a special place where they either recycle them properly, or reuse them.

Personally, I don't use disposable cameras myself. The image quality of plastic disposable cameras simply can't compete with that of a professional grade glass and modern DSLR body. On the other hand, I would use them in rare occasions such as diving (waterproof version), or when I'm given one in weddings and/or parties.

My wife bought a bunch of disposable cameras for our wedding this year. I kept a camera body for fun (and because there is a special 70s vintage look that the plastic lens gives). At the end of the wedding, we collected them, developed them, and compiled the good pictures into a collage that we added to our wedding album. Below is a picture of one of the disposable camera bodies that I kept:


It is important to note that many disposable camera bodies have a REVERSE LOADING mechanism. Whereas most film camera bodies require loading a fully loaded film cartridge into the body (and require you to crank back when you're done with all the frames), most disposable camera bodies are pre-cranked. That mean every time you use a disposable camera and crank a frame, you're actually loading back the 35mm film cartridge. In another word, when you're done with all the frames, you've already cranked the entire film back to the cartridge.

Here is a picture of the back of the camera (this one has no film, I already took it out for development):

Let's open it up and reload it

To open it, pull the tab/switch which releases the back film cover lock:


Here is a view of the inside. Now let's load it with a 24 exposure or 27 exposure film. My favorite is the Kodak Ultra Max 400 ISO 24 exposures. It is cheap and plentiful. I bought a bunch from my local clearance warehouse (4 rolls for $4, 8 rolls for $7, and 12 rolls for $10). That comes out to be less than $1 per roll! My local Walmart also has the exact same 4 rolls for about $6.80. By the way, now is a great time to load up on a lot of cheap consumer film because 1) no one is buying them 2) they're plentiful 3) they're on special clearance 4) they're going to disappear very soon. In the near future, the only film you'll be able to get are the professional grade films which costs a bunch.

Take a look at the film counter on top, and hand crank it on the film cog until it reads 24 (or 27 if you got the 27 exposure film). This is a counter that counts backwards to indicate approximately how many frames are left.

Load a new film:

Nudge the top of the film cartridge into the crank:

Now that the film is firmly in place, pull the film towards the left side of the film chamber:
Now pull out the crank tab on the bottom. You'll need to apply pressure and crank it all the way later on. By the way, that purple thing on the bottom is the AA battery. Make sure to check for voltage. Anywhere between 1.0 to 1.5 volt is fine-- you only need it for flash (no electronics) so it doesn't need to be exactly 1.5 volt:

Pull the film to the left chamber till the notch is right on the left crank latch:

This is very important: pull the film until the edge of the film notch is firmly attached to the little latch on top of the left crank:

You'll need to crank this soon. Let's put the back film cover.

Carefully put the back film cover, make sure it is properly placed seated and that light is completely sealed or else you'll expose film at a later point!!!

Now that the cover is properly place, it is time to crank the film to the left chamber -- all the way. You should feel some pressure as you're cranking the film all the way to the left chamber. Hopefully you've already done film for a while and have developed a good sense of whether the film is loaded properly or not... if not, ask someone with a few years of film experience to verify for you.

Keep cranking until you can't crank anymore. The right chamber is now empty, while the film is all the way cranked to the left chamber. You're done!

If you have a cover, put the camera inside. If you want to make your own personalized cover (and there are lots of software out there that does this), go ahead and print them.


Voila! You've reused the camera while saving the environment:


Below is a collage of the pictures that people took during our wedding. Half of the pictures look as if they're pointing upwards; it turns out that little kids love to play with these cameras! Note that 2/3 of the pictures turned out very dark-- people keep forgetting to press down the flash-charge button before taking a snapshot. So if the cameras are to be used indoors, make sure to tell everyone to use flash indoors!

2008-12-19

Flickr vs. Picasaweb

vs.

People often compare Flickr to Picasaweb. While both allow people to upload photos to share with other people, it's really an apple and orange comparison.

Flickr:
A company that Yahoo acquired. Flickr is a very popular social platform for amateur photographers to upload their art work. The free account has a 100MB/month limit and they downsize your original pictures. Photography enthusiasts critique each other's photo styles and techniques, and can favorite, add to groups, etc. Flickr retains almost all of the original EXIF information so that amateur photographers can look at a picture's f-stop, shutter speed, ISO, and other settings and critique and learn from each other. Not surprisingly, many uploads are of high quality art work. Many people decide to buy the PRO version of Flickr because it's that good.

On Flickr, I expect to get comments from random photographers like "Why are you using 640 ISO during broad day light, and why is the depth of field so shallow that you're missing critical backdrop details? Oh I love the 24-70mm f/2.8, that is such a sweet lens, sharp in all aperture."


Picasaweb:
A Google built property. This is a popular dumping ground for people who want to share tons of family photos. It's very easy to use: 1) download a Picasa PC/Mac client 2) drag/drop photos into Picasa 3) then photos get uploaded to Picasaweb. Not surprisingly, many uploads are of boring and mundane looking family photos. This is a wonderful site for people to dump private stuff too. There is a 1GB/account limit, and you can buy more storage. It lacks some of the EXIF information and lacks that social feel, but then again, the target audience of Picasaweb is really your grandpa and grandma who don't give a damn what Facebook and Twitter are about anyways.

On Picasaweb, I expect to get comments like:
"LOL!"
"This sucks"
"WTF?"
"Which one is better, Canon or Nikon?"


So as you can see, apple and orange. When I need feedback from my fellow photographer enthusiasts, I upload to Flickr. I expect to get very useful and very technical advice on Flickr. On Picasaweb, I upload private family pictures, usually in the 1600 width resolution since that is the resolution that looks pretty good on 90% of the monitors today. Anything bigger is useless, and a waste of space. What I don't do these days is emailing or uploading the original pictures-- the funny thing is I still get people mailing me megabytes of original pictures. That is soooo very 1990s.

2008-11-20

Post processing -- DPP, NX2, Lightroom

This is an ultra lightweight review of editing software from Nikon, Canon, and Adobe on a recent Intel based laptop running Windows XP with 2G RAM (Lenovo X61). Before we get to the review, let me clarify what post processing is. Post processing is an essential part of being a good photographer. Many people will argue that people in the old days simply turned their films to photolabs to develop naturally without any post processing, and that processing makes photos look unnatural.

The fact of the matter is during the early days of photography people had to develop each and every picture from negatives manually. They have to compensate for exposure (test strips), and create details by changing contrast filters, and burn and dodge to get the greatest details. People can try to redevelop Ansel Adams negatives but the prints will look lousy-- all of his magic happened in the darkroom and development process, and none can be reproduced faithfully.

As to pictures being unnatural-- first of all, there is no such a thing as natural pictures. The moment natural light passes through human made lenses, then gets recorded on film or sensors, then reproduced back to paper or LCD screen, it's anything but natural. Dynamic ranges will be completely off, colors will be changed, details will be lost.

The difference between processing yesterday and today is that yesterday, we processed in stinky darkrooms (or color photolabs), and today we process in the comforts of our homes with our computers.

----------------------------------

Canon DPP:
As with most Canon packages, Canon Digital Photo Professional is free with all of their DSLR cameras along with many other software utilities. DPP is lightweight in terms of disk and memory footprint and it is blazingly fast. The GUI is very intuitive. Unfortunately, it's for Canon exclusively so if you need to edit other RAW files, you're out of luck. Installation is a breeze though many fancy features are missing. One of the biggest features that is missing is cropping.


Nikon NX2:
As with most Nikon packages, Nikon NX2 is *not* free. It is 60 days trials and $200 to buy. It is free only if you buy the prosumer and pro camera bodies (e.g. D3, D300, etc). While the GUI is awful, it's actually pretty powerful. I like how you can select certain color/ranges, and selectively accentuate or diminish tones/color/contrast very easily. It's better than the magic lasso that Photoshop has (the last Photoshop I used was v. 7.0). I think it has pretty much all the features of Lightroom for 1/2 the cost, but has a very retro looking UI that's clunky (requires lots of clicks in weird places). It is SLOW SLOW SLOW. I've heard that it works best if you have Windows Vista with at least 8G of RAM. They say that Nikon's software is inversely as good as their hardware, and the NX2 GUI and the huge hardware requirement really shows.


Adobe Lightroom 2:
Adobe LR2 is becoming the industry standard tool for organizing thousands of photos and light editing. Many pros are skipping Photoshop completely because they only need to color balance and crop, and LR2 does these tasks blazingly fast. It is built for fast and efficient workflows-- from tagging pictures, ranking pictures, mass 1 step color correction, mass file generation, etc. It also allows very light editing such as spot editing, graduated ND filter, dual toning, curves, etc. LR2 trial is 30 days. I got my copy for only $130 during the "Oh no we can't sell anything we gotta lower the price" Amazon special, but normally it is $279 on Amazon and $190 on eBay.


In the end, I didn't want to use Apple Aperture because it's Apple specific. I liked DPP but it's not powerful enough. NX2 was powerful but it's a beast and it crashed on me all too often. Lightroom has its problems but it's the best out there today.