2009-08-07

How blurry is your Hollywood Style Creamcheese Bokeh?

Lens sharpness is of high importance for most photographers. When a picture is sharp, they see more details. When they see more details, the viewers' neurons fire as if they're saying "Oh this really captures the moment, I love this picture." There are lots of published reports on lens sharpness. Manufacturers and independent testing corporations have their own MTF results that describe a lens' characteristics in terms of contrast and resolution. The more contrast and resolution a lens can reproduce, the "sharper" an image will project to the film or sensor. Every lens has a best and worst sharpness depending on the location (center or corner) of the projection, and it is very dependent on its aperture. In general, almost all lenses have the best "sharpness" in the center at the sweet spot of the middle f-stop (for full frame, that is about f/5.6-f/8).

While there are numerous published MTF, there is not a standard when measuring the quality of blur (aka "bokeh") in a lens. This is mostly because the quality of a blur is very subjective. Below are two pictures using two different lenses (courtesy of http://www.rickdenney.com):


Don't look at the wine-- both are equally sharp. Look at the background blur. A majority of the people on internet forums will say that the background blur for the top picture is very busy and distracting, while the background blur for the bottom picture is more uniform, more creamy and soft. The top one has a lot of bokeh balls that look like donut rings, whereasa the one on the bottom has more creamy, soft, smushed artistic look. Ken Rockwell has a pretty good graphical explanation here. Of course, there will always be a minority that prefers a busy looking bokeh (with donut ring shapes, weird shapes, inconsistent inner fill, etc).

While lenses optimized for sharpness are great for action/sports, landscape, and architectural work, lenses that yield soft creamy bokeh are great for portraits and for artistic purposes. So while it's interesting that while many people spend lots of money buying the sharpest lenses, there are a few who will spend even more buying the lens with the softest bokeh money can buy. Below are two artistic bokeh examples I found that I like:

Courtesy of Rogvon. This using a 55mm Voitglander which yields an amazing creamy soft bokeh.


Courtesy of Dustin Diaz. This is using the famous Nikkor 200mm f/2 which yields a huge bokeh. Note that many new Nikkor G lenses tend to exhibit a ring around the bokeh ball. This is a very typical 200mm f/2 bokeh.

According to Google Trends search, more and more people are looking at lenses not just based on the criteria of sharpness (which is of high importance for most work out there), but also bokeh characteristics. Lately, I've been hearing the term "Hollywood Style Creamcheese Bokeh". It really means the same thing as just "bokeh", it's just that the word Hollywood emphases the blurring and transition techniques commonly used in Hollywood movies.


What lenses do portrait photographers use? They use the lens with the most pleasant looking bokeh so that they can obliterate the background into soft and creamy cheese to make their subjects pop out. The best bokeh lenses are ones that are f/2.8 or below (which happens to be the minimum aperture for pro-line lenses), usually 85mm and above. The biggest bokeh shape is achieved by 1) grabbing the longest lens you can get your hands on 2) opening up the aperture from f/1.4 to f/2.8 3) setting the lens focus distance to MINIMUM while moving your body to aim at the subject 4) making sure the background light source yields a nice blur 5) use LIVE-VIEW on the camera because bokeh cannot be seen on the viewfinder. Note that even if you try all of the above, you will not always get a consistent result. The reason is bokeh is not only sensitive to focusing distance and settings, but also dependent on background light intensity! This is why the lens that yields a nice bokeh one day may not yield the same the next day-- a lens will have a tendency to yield bokeh one way or another, but that tendency is not guaranteed 100%.

Below I have put up a result of different bokeh characteristics of the different lenses I used. The background green and blue bokeh balls are my router and cable modem lights. By taking the bokeh of a light source at night time, I am isolating the shape, transition, and fill of individual bokeh looks for more objective viewing. I need to do this at night because during day time, all the light balls will be smushed together, and the background blur will usually look pleasing regarding of the lens used. Note that I don't own all of the lenses below. Thanks to everyone who lent me their babies.

Click here to see it in details:


Personally, my favorite is the Nikkor 24-70mm f/2.8 used at 70mm. It is a very versatile zoom with the quality of a prime lens, and the bokeh shape is mostly consistent and the fill is solid. There is a slightly line/edge on the rounded bokeh balls, but that is acceptable IMHO. There are not many lenses with great bokeh AND sharpness-- this is one of them.

My second favorite is the Nikkor 105mm f/2.8. It has a very low minimum distance, thus small objects can have huge looking bokeh. It can also obliterate the background into art. The contender 70-200mm f/2.8 is an excellent bokeh lens, but I didn't have one to play with at the time.

The Lensbaby Composer (the 3G is a typo) is a very good bokeh lens when used at f/2.8 and beyond.

The softest, creamiest bokeh is the Sigma 50mm f/1.4 at f/1.4. The edges are super soft, it's like an angel painted the balls! However, f/1.4 on this lens aperture yields very soft images.

A peculiar bokeh here is the old 1980 Nikkor 50mm f/1.8 AI-S. It has 7 blades, and you can see the heptagonal bokeh at a higher aperture. This can be useful for certain types of shot (product with shapes). I wouldn't use it for people or pets though, but you'll see this peculiar bokeh characteristic frequently in older pictures, especially from the 60s to 80s-- the era Nikon ruled the SLR 35mm world.

Lastly, it's important to note that none of these examples have ugly donut shape bokeh like ones from the 18-200mm f/3.5-5.6G VR (I had it for 2 months and sold it off). This is a hideous lens that yields ugly busy background blur. There are numerous other really bad bokeh lenses, mostly those with higher than f/2.8 aperture (e.g. 3.5-5.6, 4-5.6, etc etc). I didn't have the pleasure of testing+trashing them here, but if you Google for their names and the word "bokeh", you can see how bad they are.

2009-08-05

Strobist: producing Googly colored shadows


I stumbled across an article where I couldn't figure out how lighting was done in such a way that there were 3 different colored shadows casted on subject (see http://www.style.com/vogue/feature/2009/07/machine-dreams/ for the full article on Marissa Mayer below):


Then Thomas Kang told me "I believe it's subtracting colors, not adding them. You set up multiple color lights that add up to white, then when something gets in the way, it occludes only some of the lights but not the others, resulting in "shadow" areas where only those non-occluded lights shine, which no longer cancel out entirely, so they produce colors" Well duh! I knew that! :) I was curious to see how easy it was to duplicate the result, and took out my 3 flash and gelled them with different colors: yellow, blue, and red. Here are the results:

First, I make sure that ambient light isn't contributing to exposure (indoors, 200 ISO, f/4, 1/200 second):

Then, I set up the 3 strobes (yellow and blue on opposite sides). I took six different exposures taken at different times. By the way Buster is a very good super bear model and sits still very well.

Top left: yellow only. Top middle: red only. Top right: blue only.
Bottom left: no yellow. Bottom middle: no red. Bottom right: no blue

As you can see, bottom middle or blue+yellow make almost perfectly balanced colors (complementary). Adding a tint of red, and then manually doing white balance later yields the final result below with all 3 flash on:

That was pretty fun! By the way if you look at Marissa's picture, you'll see that there's at least yet another light (white) on the left side in order to make a harsh shadow to the right. Also the order of the color is different than the one I used. Now go out, gel your flash units and have fun!

2009-07-29

ChateauLooey

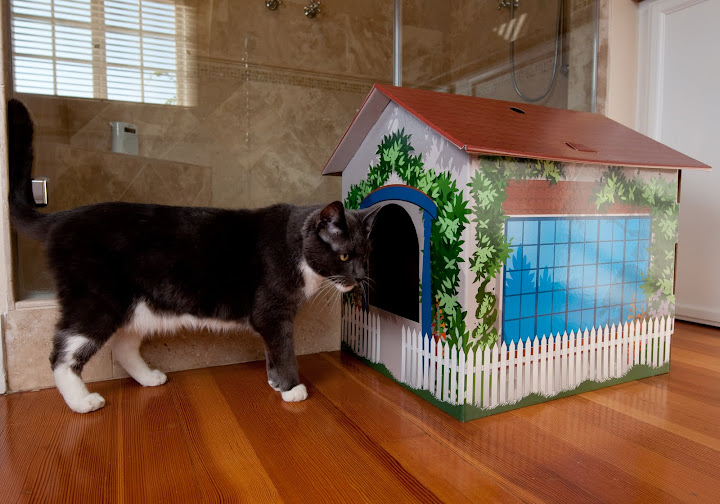
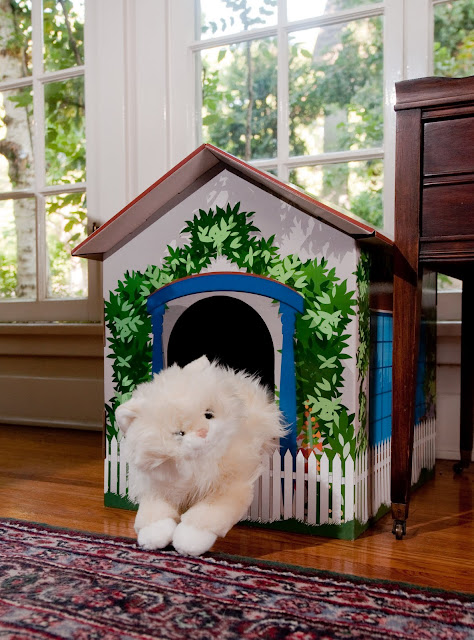
This is one of the most interesting shoots I've done in my life. The client runs a business selling cardboard homes (ChateauLooey) that cover up the litter box. "Hide unsightly litter boxes with a charming lightweight, durable litter box cover made of heavy grade corrugated box material."

The client wants to revamp their current web site, with new designs and new pictures. The 6 cardboard homes look really great in person... beach home, cottage home, brick home, etc. However, the web site doesn't do justice. The assignment is to make each home standout, with style. The client also would like to use their cat Wooster as the model. I quoted 3 hours on-site+ editing, and it was pretty much a spot on estimate! In short, it was 30 minutes product-shot setup (backdrop, stand, umbrella, lighting), 1.5 hour shoot behind the backdrop, and the remaining hour in a real home environment. Wooster had a tendency to run out, but it was easy to place him inside the cardboard box, and he would sniff around, walk out, walk around, etc. during which I had precious seconds to take pictures before he ran elsewhere.


Here's the video I created for the client which will be placed on their website:


It was a pretty pleasant shoot. No animals were injured. Including the photographer.

P.S. The new design with new pictures and a video should be out in a month or two. Special thanks to Christine and Redseed Media for giving me the opportunity.

2009-07-24

"Help my HD is filling up fast"

A good 'ol friend of mine took a picture of his condo to put online, and I spent about 2 minutes doing basic editing to make it look more "homey" by warming it up, sharpening foliage, and adding more definition to the mid-tones while recovering a little bit of details in the highlights:

Later on he asked:
BTW, how do you save/backup your pictures? Currently, I just copy them into two HDs.
But with my new camera, the space is filling up quick. Also, what about sharing? Do you upload your orignial pictures? 7M each?

If you just got a brand new spanking XXX megapixel camera and if you're filling up your HD fast-- you're most likely machine gunning your camera. In another word, you're taking too many pictures. Let's say you take 100 full size resolution pictures per session. For a typical [2009-spec'ed] 15 megapixel camera, that is 20MB in raw and ~2 to 8MB in JPG (depending on your setting), or up to 2GB/session. If you have a 100GB HD, you'll fill up your [2009-spec'ed] HD in a short period of time.

Are all of those pictures "usable" pictures? When I say usable, I mean are they good enough that someday, you'd be willing to spend $20/frame to print them as posters? Most likely, the answer is no. In all likelihood, you're not going to use every single one of those 100 pictures to print and to publish on the web. In all likelihood, more than 90% of those pictures will end up on the hard-drive, sitting there forever, never to be seen again.

In the old film days, people thought very carefully about their shots-- composition, lighting, color, timing. Each frame needed to be developed and printed, and each frame had a substantial cost to the photographer. Not surprisingly, for a typical photographer in the old days, each roll of film had many good looking shots (compared to today's DSLR shooters) because each frame had a cost, so a lot of thought was put into each frame before the actual shot.

Today however, people think digital is free, so they machine gun shot their digital cameras. They take one picture. Then take another. Then another. To make matters worse, camera makers today advertise that their cameras have really high frames per second, and many macho guys love it (they tend to also the ones that love BIG ZOOMs). They like to show off with their super fast click-click-click-click-click camera. It's as if they're screaming "I am a super cool sports photographer and I can make lots of photos! Listen to the super cool click-click-click-click-click sound my super camera makes!" Yeah, whatever. Maybe these guys like big zooms and fast frames-per-second cameras because they compensate for their small penis or something. I don't know. Anyways, after the session is over, people upload hundreds and thousands of bad looking family photos on Picasaweb, and share it with people who don't actually have time to look through every single one of the thousands of boring looking photos. They do so, because it's so easy to machine gun cameras, and it's so easy to upload to Picasaweb.

Unfortunately, there is a cost of taking too many pictures. That cost is time. One needs to spend initial time managing (picking/filtering and editing) pictures. If the photographer ever needs to find pictures to use in the future (wedding slide show, baby shower, etc), then he/she will have to spend a lot of time sorting through thousands of pictures. If each picture takes 1 second for the brain to parse, then 1000 pictures will cost 16 minutes, not counting software lag. If the average layman machine guns 10000-20000 pictures per year, then the future cost of time would be HOURS and even days. Lastly, there is also the time a photographer incurs on others when he/she shares bad pictures to others. I can't tell you how many times people upload 3000 [really really bad] pictures from their vacation and ask me to critique. They're incurring HOURS on me, and to their friends.

1) My first useful advice to storage woes is-- think more, shoot less.
2) Pretend that you're using a film camera. Pretend each frame costs $0.50. You need to nail your focus and exposure correctly. You have one shot. You think carefully, and make that one shot. Alternatively, if you're a macho machine gun kind of guy, you can pretend that you're a US Army Sniper. "One shot, one kill" is their slogan. You have one chance. So slow down, breath, think carefully, and make that one shot. By doing so, you will A) ensure that all your shots are well thought out, and therefore, will be spot on and B) you'll gain intimate knowledge of your camera settings, and gain knowledge of lighting in general.
3) DELETE BAD PICTURES while you're shooting. Ask yourself "Is this picture good enough that I'm willing to spend $20 to print on a poster?" If the question is no, delete it. Also ask yourself "Does this picture have good sharpness? Does it have good colors? Does it look like something that I can put up in my kid's wedding slide show? Does it look like something I can put in a yearbook?" If the answer is no, delete it. Delete delete delete.
4) DELETE DUPLICATE-LOOKING PICTURES. People often take a shot, then take another. "Smile! Click. Wait let me take another one just to be safe. Click. Wait one more." When you have a bunch of similar looking shots, there will always be one shot that looks better than the rest. If you're going to print or share the best one, you're most likely never going to use the ones that aren't as good. Therefore, delete the rest. Why keep anything that is anything but the best?
5) Share less pictures. People in the 20th century have ADD and get bored after looking through 50 pictures. In the old days 35mm film had 24 or 36 exposures-- people didn't get bored after looking through a roll of film because they had enough attention span for up to 50 pictures. But people today get really bored with today's pictures, because people shoot too many! So instead of mass uploading 3000 pictures (yes I know it's super easy to do in Picasaweb), pick out your top 20-30 and upload those.
6) If taking JPG, downsize the resolution. If your destination print is the internet, then 1600x1200 is way more than sufficient. So why waste 4700x3100 pixels on a typical 15 megapixel sensor? Taking 4700x3100 is over SEVEN TIMES the size you need for your normal 1600x1200 size. You may be thinking that you need to make big prints (300dpi). First of all, megapixels is just one equation on making good prints-- 100 lousy megapixels will look worse than 10 good megapixels (other factors affected by lens quality, lighting, etc). In general, 8MP is more than enough for 8x10 print, so no need to use 15MP if you don't need to. Downsize it.
7) Backup backup backup. Storage is cheap, but get the right type. People are now just finding out that burned DVDs only last 10-20 years. Even hard drive quality isn't what they used to be-- many break down in a matter of 3-5 years.

I personally use a consumer grade RAID-1 network drive (two mirrored 1TB hard drive) as a primary drive, and a 500GB+200GB external drive for backup. I know one of these disks will fail in a few years, so it's imperative to use RAID-1 and/or backup. Here are some datapoints: this year I had a 750GB Seagate fail after 10 months, a 1TB Seagate fail after 3 weeks. In the past I've also had a catastrophic failure of the famous IBM 60GB Hitachi Deskstar (aka Deathstar), and a EIDE Maxtor drive failure. Devices fail.

For a given price, hard drive capacity doubles every 12-18 months. For example, last year, the cost of 1TB was $200. Today, it's less than $100. As long as the rule of doubling is true (and it has been for ages), then you can buy whatever storage you need today, and buy double the capacity when you need more. For example, if you filled up your 1TB this year, just get a new 2TB this year ($200) and copy everything over to the new 2TB. Next year when your 2TB is filled, buy a new 4TB next year ($200) and copy everything over to the new 4TB drive. When your 4TB is filled, buy a new 8TB ($200) and copy everything over to the new 8TB drive. What do you do with all the old drives? Safe-format (secure format 4-8 times) and eBay. There's no point keeping a bunch of old drives that'll become paper weight in less than 5 years. High-tech means "obsolete very soon." Keep your data, throw away technology.

In short, hard drive may be dirt cheap today, but the cost of management is not. The best way to use your digital camera is to pretend that it's a film camera... every frame has a cost to it, so think more, shoot less. By doing so, you'll end up with a lot of good pictures, and save a lot of management time, while gaining more knowledge and appreciation for photography.

2009-07-04

Thank you Patrick

I went to Northern Cal for vacation on the week of June 29. I got a chance to meet up with my coworker/colleague/friend Patrick Hung, a former pro photographer. Patrick said he had a bunch of photography stuff that he no longer have a need for. I didn't know exactly what to expect and boy oh boy, all the goodies exceeded my expectations! First of all, a real backdrop plus 2 9' professional-grade backdrop stands... JackRabbit rapid flash charger (I'll need to get an adaptor for the SB-800/900 since the adaptor is for a flash in the film days), a *real* studio flash unit with light bulb+flash (WOW), a camera flash bracket, a bulb release extension that fits on my FE2 (this is a electro-mechanical film camera). I offered $ and dinner but Patrick was such a generous guy; he wouldn't take anything but thanks. THANK YOU PATRICK.

Here's the first trial using the low-key backdrop. Manual exposure at 1/200 sec, f/4, 200 ISO. 1 SB-600 under umbrella at 1/16 power, 1 SB-600 pointing upwards at 1/4 power, 1 SB-800 rimlight snooted towards the hair (on the left side) at 1/32 power:

Here's when the model stops behaving:

Here's the setup (this shows 2 umbrellas but the top 2 pictures only used 1):

By the way here is something I learned about velour-type backdrops. The Photek instruction sheet that came with the backdrop says something to the effect: "Don't fold or it'll crease. Just stuff it in the bag. If it creases, just hang weight and wait." I thought, wouldn't it be better if you fold it carefully and roll it up? After a few days of experimentation, it IS better to just stuff it in a random manner. The random crease pattern under flash actually gives out a natural marble-like texture. On the other hand, when you fold it, there is a very noticeable crease that the eye can spot easily. So, there ya go-- it's is [sometimes] better to be lazy-- just stuff it in and everything will just turn out fine!